
If you’re a drum set enthusiast or just starting out as a drummer, assembling your hi-hat can be a daunting task. Fortunately, this step-by-step guide is here to help! With a detailed diagram included, you’ll be able to put together your hi-hat with ease and confidence.First things first, gather all the necessary parts – the top and bottom cymbals, clutch, felts, and washer. Take your time to ensure that everything is present before beginning the assembly process. Once you’ve got everything at hand, you can proceed with the next steps.The second step is arguably the most crucial one – attaching the clutch to the hi-hat rod. This part is where most beginners face challenges, but with our guide, you’ll quickly navigate through it. The guide also outlines how to install the felts and washer, ensuring a secure and stable set-up. Finally, the last step of assembling the hi-hat involves placing the top and bottom cymbals in place. It might seem like a no-brainer, but it’s vital to get this step right for optimal sound quality. Our guide covers how to align the cymbals and tighten the wing nut, ensuring that your hi-hat is ready to rock.Don’t miss out on the convenience of having an assembled hi-hat at your disposal. With our step-by-step guide, putting together your hi-hat has never been easier. Read on to learn more and take the first step towards unleashing your drumming potential!
“Hi Hat Assembly Diagram” ~ bbaz
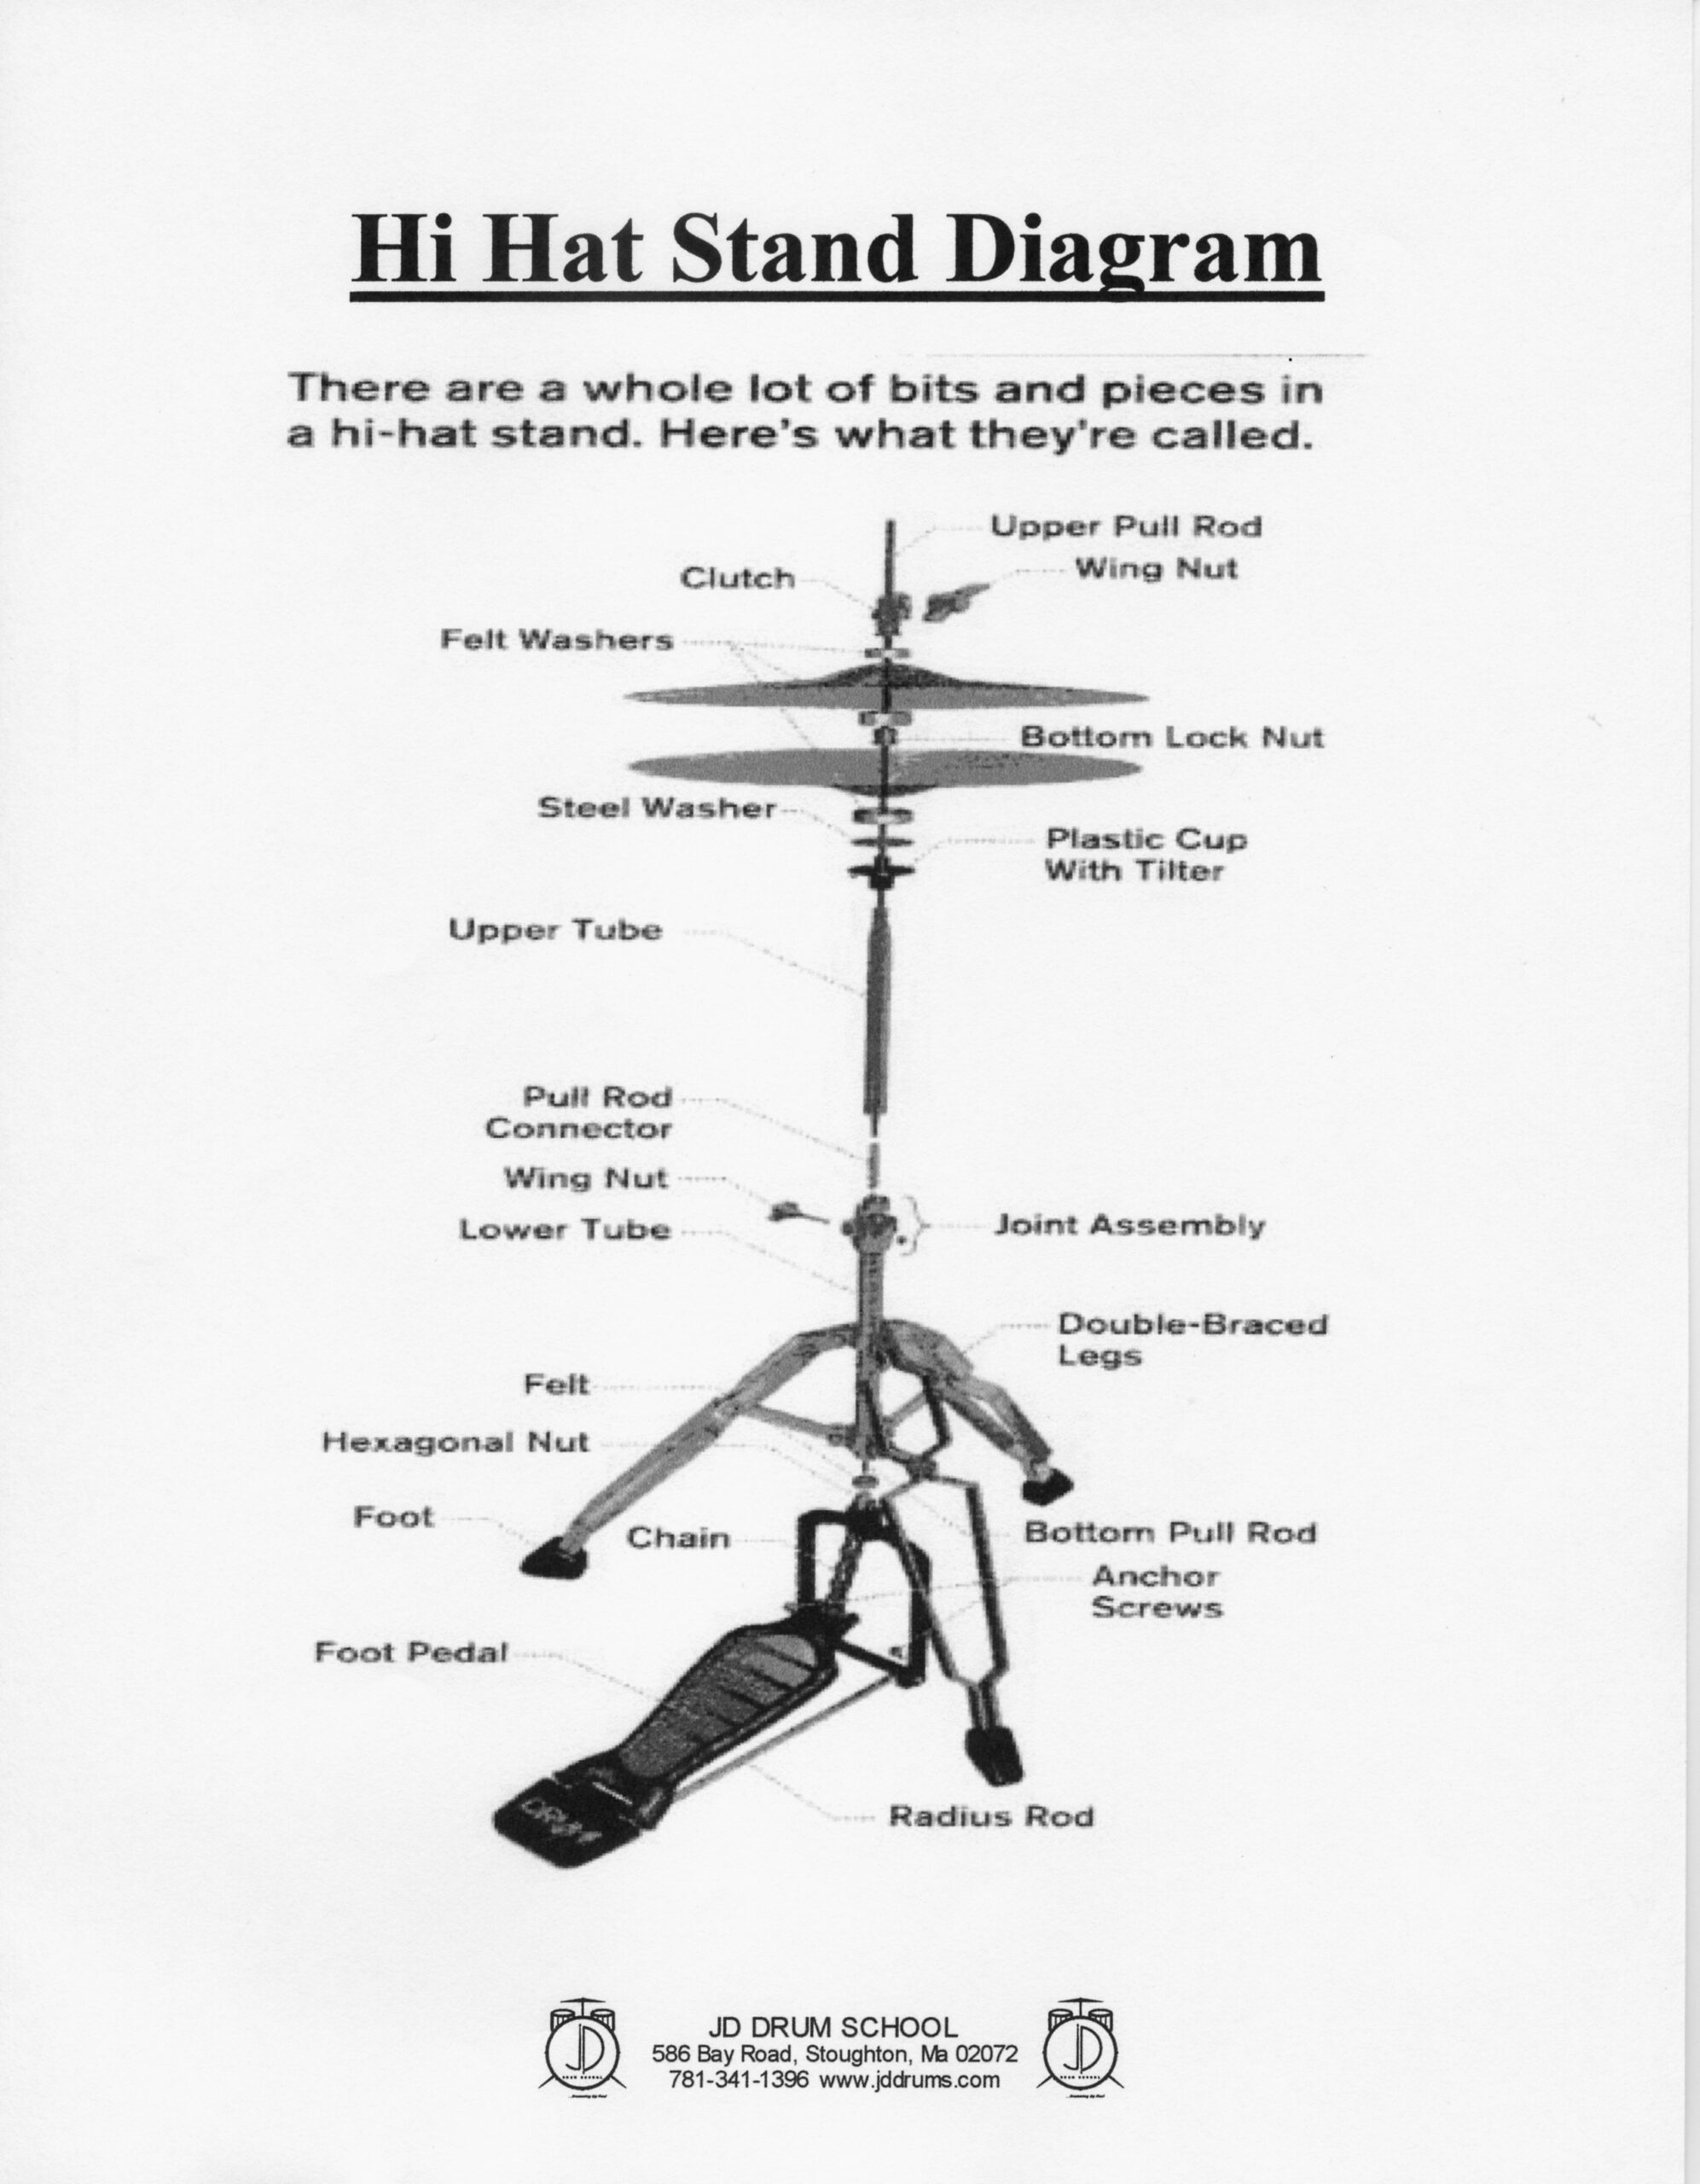
Introduction
Before purchasing a hi-hat for a drum set, it is important to learn how to assemble it properly. A hi-hat assembly guide can help you with this process. In this article, we will compare two of the most popular step-by-step hi-hat assembly guides available online.
Guide 1: TheStep-by-Step Hi Hat Assembly Guide: Diagram included!
This guide is a step-by-step instructional manual which comes along with diagrams to provide clarity. The guide is easy to understand and follows a systematic approach to assemble the hi-hat. The guide is perfect for beginners and can be used as a reference point later on.
Pros:
- The instructions are clear.
- The diagrams help in providing clarity.
- The guide is systematic, which makes it easy to follow, and reduces the chances of errors.
Cons:
- No video tutorial available.
- Some users may find the instructional manual too basic.
Guide 2: Drumming Review’s Step-by-Step Assembling Guide
This guide contains an instructional video that shows how to assemble the hi-hat from scratch. The guide is excellent for visual learners who prefer to watch someone demonstrate the assembling process instead of reading instructions.
Pros:
- Contains an instructional video.
- Clear instructions in the video help reduce errors.
- Expert tips included in the video help improve technique.
Cons:
- Sometimes the camera angles are not optimal, making it difficult to follow the instructions.
- No flexibility to go at a preferred pace, and may not work well for people with slow internet connections.
Comparison Table
| Features: | Guide 1: The Step-by-Step Hi Hat Assembly Guide with Diagram included! | Guide 2: Drumming Review’s Step-by-Step Assembling Guide |
|---|---|---|
| Format: | Instructional manual with diagrams. | Instruction video with detailed demonstrations. |
| Pros: | Clear instructions, diagrams help in providing clarity, systematic approach, easy to follow. | Contains an instructional video, clear instructions in the video, and expert tips included. |
| Cons: | No video tutorial available, some users may find the instructional manual too basic. | Camera angles in the video may not be optimal, no flexibility to go at preferred pace, may not work well with slow internet connections. |
Final Thoughts
Both Guides are excellent resources for assembling a hi-hat. Choosing between the two depends on individual preference. If you would like to use manual guides, then guide one works best for you. On the other hand, if you are a visual learner, then guide two is the best option.
Overall, both guides provide valuable information and guiding steps that can help you assemble your hi-hat correctly. Ensure that once you start assembling the hi-hat, you pay attention to every detail outlined in the guide to maximize your time and ensure you assemble an efficient hi-hat.
Thank you for taking the time to read through our Step-by-Step Hi-Hat Assembly Guide. We hope that this guide has been helpful in providing you with a clear understanding of how to assemble your hi-hat cymbals. We understand that getting your hi-hat set up correctly can be a daunting task, but with the help of our guide, we’re confident you will be able to do it with ease.
If you have any questions or concerns, please do not hesitate to reach out to us for assistance. At our company, we pride ourselves on providing excellent customer service and support to all of our clients. We believe that every musician deserves high-quality equipment that is constructed well and functions properly.
Finally, we would like to remind you to always refer to the manufacturer’s instructions when assembling any musical instruments or equipment. Although our guide provides a general overview, there may be specific steps or precautions that apply only to your particular make and model. Following the instructions carefully will ensure that your hi-hat is safe and functional.
Step-by-Step Hi Hat Assembly Guide: Diagram included!
If you’re looking to assemble your hi-hat cymbals for the first time, it can be a bit overwhelming. But don’t worry, we’ve got you covered with our step-by-step guide and diagram. Here are some common questions people ask about assembling their hi-hat cymbals:
- What tools do I need to assemble my hi-hat cymbals?
- How do I attach the bottom cymbal to the hi-hat stand?
- How do I attach the top cymbal to the hi-hat stand?
- What is the proper distance between the top and bottom cymbals?
- How do I test the sound of my hi-hat cymbals?
You will need a drum key, hi-hat clutch, and hi-hat stand. Some stands come with a clutch already installed, but if yours doesn’t, you’ll need to purchase one separately.
First, place the felt washer onto the hi-hat stand rod. Then, place the bottom cymbal onto the stand with the bell facing up. Secure the cymbal in place by tightening the wing nut underneath the stand.
Place the hi-hat clutch onto the stand rod. Then, slide the top cymbal onto the clutch with the bell facing down. Tighten the clutch so that the cymbal is secure but still able to move up and down.
The ideal distance between the top and bottom cymbals is around 1 inch or 2.5 centimeters. Adjust the clutch to achieve this distance.
Hit the top cymbal with your drumstick to hear the sound. Adjust the clutch tension or cymbal placement if necessary to achieve the desired sound.
Following these steps and referring to the diagram should make assembling your hi-hat cymbals a breeze. Happy drumming!